Joanna Jankowska
Software Engineer

10 min read

December 29, 2021

How to Build Chrome Extensions with React

What will you learn

Our shared need for precision, fair play, and heightened tension during matches shapes a willingness to incorporate new sports technologies.

  1. Moreover, this technological enhancement adds a layer of suspense and anticipation.
  2. Intensifying the drama of each match and contributing to a new dimension in our evolving sporting landscape.
  3. Moreover, this technological enhancement adds a layer of suspense and anticipation.
  4. Intensifying the drama of each match and contributing to a new dimension in our evolving sporting landscape.

Chrome extensions have become a popular way to extend the functionality of many web apps by making them easier to use and more accessible. However, despite how common they are, building them is not so straightforward, especially when you are using a more complex stack with modern web frameworks such as React.

Chrome Extensions Structure

To understand how to build chrome extensions with React (specifically CRA), we first need to grasp the typical structure of a Chrome extension. An extension consists of these elements: background script, content scripts, popup (html + js), manifest.json.

Chrome Extension structure (from Chrome Developers)

  1. Background script – the extension’s core, which runs in its own environment (or ‘context’). It’s active and running as long as your browser is open and the extension is enabled.
  2. Content scripts – scripts that are injected into websites and run in their context. They are written using JavaScript and hence can do whatever JS can – change the styles, inject html, send requests etc. We can control whether they run in all websites you visit, or only on specific URLs.
  3. popup.html is the html file that is opened by default in the popup window when you click on the extension’s icon. Like any html file, it can have CSS and JavaScript attached to it.
  4. manifest.json – the main source of truth for the browser, here is where all the specifications of our extension are, such as name, version, icon etc. Here is also where we write the paths to our content and background scripts, and where the main problem with React and CRA occurs. We will get to this next.

By clicking this button you agree to receive information from TeaCode about software development and app marketing, the company and its projects to your email. Your data is processed by TeaCode (Postępu 15, 7th floor, 02-676 Warsaw, Poland) to send you relevant content via newsletter (from which you can unsubscribe at any time). You can read more in our Privacy Policy.

Chrome Extensions + React (CRA)

Let’s start by creating a new CRA project. We will build an extension that injects a popup onto a webpage on the click of a button inside the extension’s main popup.

npx create-react-app chrome-extensions-react-demo

In order to run a React app both in the main popup and the current webpage, we will need to technically create two React applications: one that gets rendered inside the popup.html file, and one in the context of the webpage.

Let’s start with the popup.html. To get this part to work, we just have to ensure CRA’s index.html is correctly added in the manifest.json in the ‘default_popup’ field. I have renamed it to popup.html to clearly distinguish it.

We also need to edit the manifest.json to fit the chrome extension structure. We’ll add a manifest version property to the file with the value ‘2’ (the currently supported version), the app version, and icons.

Create React App by default adds an inline script to the html file, which in chrome extensions will cause errors in the console. To disable this behaviour, we have to add this line in the .env file:

INLINE_RUNTIME_CHUNK=false

Let’s adjust the popup’s styling since it looks a bit wonky with the default styles. We need to keep in mind that the maximum size of the popup window is 600px height by 800px width.

1/* index.css */
2
3html, body, #root {
4  height: 200px;
5  width: 200px;
6}
7
8body {
9  margin: 0;
10  font-family: -apple-system, BlinkMacSystemFont, 'Segoe UI', 'Roboto', 'Oxygen',
11    'Ubuntu', 'Cantarell', 'Fira Sans', 'Droid Sans', 'Helvetica Neue',
12    sans-serif;
13  -webkit-font-smoothing: antialiased;
14  -moz-osx-font-smoothing: grayscale;
15}
16
17code {
18  font-family: source-code-pro, Menlo, Monaco, Consolas, 'Courier New',
19    monospace;
20}
1/* popup.css */
2
3.App {
4  text-align: center;
5  height: 100%;
6}
7
8.App-logo {
9  height: 40vmin;
10  pointer-events: none;
11}
12
13@media (prefers-reduced-motion: no-preference) {
14  .App-logo {
15    animation: App-logo-spin infinite 20s linear;
16  }
17}
18
19.App-header {
20  background-color: #282c34;
21  height: 100%;
22  display: flex;
23  flex-direction: column;
24  align-items: center;
25  justify-content: center;
26  font-size: calc(10px + 2vmin);
27  color: white;
28}
29
30.App-link {
31  color: #61dafb;
32}
33
34@keyframes App-logo-spin {
35  from {
36    transform: rotate(0deg);
37  }
38  to {
39    transform: rotate(360deg);
40  }
41}

Now, to preview our application we need to run the build command and load the build folder into the browser on the extensions panel. Unfortunately, we will need to redo this every time we make a change in the app.

npm run build

This command will have added a /build directory in your app’s main directory.

Go to chrome://extensions/ in your browser, turn on ‘Developer mode’ and click load unpacked. Navigate to your app’s folder and select the /build directory.

We can now see the app in the taskbar.

Now go to any website and click on the icon. The popup should open with the default CRA app. Hooray!

Now we want to add to our app the ability to inject React code into pages. To do that, we will create a second React app to inject into visited pages. Let’s restructure the app a bit to easily separate the two React apps by putting our existing files into src/popup.

Next let’s add a contentScript directory under /src, and create two files in there: index.js – where we will be mounting the app into the DOM, and ContentScript.js which will be the main, top-level React component.

To ensure that the injected app’s scripts and styles are isolated and do not conflict with the current webpage’s, we will wrap it in a web component. In the index file, instead of mounting the app component on the div with the id of ‘root’, we will pack the app into a web component and mount it as a direct child of the webpage’s html document. For this to work you will need to install @webcomponents/custom-elements.

npm install @webcomponents/custom-elements

For the modal component I will be using MaterialUI with JSS, since they both work well in the web component shadow DOM environment and don’t require much extra reconfiguration.

1// index.js
2
3import React from "react";
4import ReactDOM from "react-dom";
5import "@webcomponents/custom-elements";
6import ContentScript from "./ContentScript";
7import { StylesProvider, jssPreset } from "@material-ui/styles";
8import { create } from "jss";
9
10class ReactExtensionContainer extends HTMLElement {
11  connectedCallback() {
12    const mountPoint = document.createElement("span");
13    mountPoint.id = "reactExtensionPoint";
14
15    const reactRoot = this.attachShadow({ mode: "open" }).appendChild(
16      mountPoint
17    );
18
19    const jss = create({
20      ...jssPreset(),
21      insertionPoint: reactRoot,
22    });
23
24    ReactDOM.render(
25      <StylesProvider jss={jss}>
26        <ContentScript />
27      </StylesProvider>,
28      mountPoint
29    );
30  }
31}
32
33const initWebComponent = function () {
34  customElements.define("react-extension-container", ReactExtensionContainer);
35
36  const app = document.createElement("react-extension-container");
37  document.documentElement.appendChild(app);
38};
39
40initWebComponent();

This is our initial code for mounting the web component wrapper for the content script React application.

Let’s now add the actual ContentScript modal that will be injected into the page.

1// ContentScript.js
2
3import { useState } from "react";
4import { makeStyles } from "@material-ui/styles";
5import { Box, Button, Typography } from "@mui/material";
6
7const useStyles = makeStyles({
8  overlay: {
9    position: "fixed",
10    top: 0,
11    right: 0,
12    bottom: 0,
13    left: 0,
14    background: "rgba(0, 0, 0, 0.3)",
15    zIndex: 999999999,
16  },
17  modal: {
18    position: "absolute",
19    top: "50%",
20    left: "50%",
21    transform: "translate(-50%, -50%)",
22    background: "white",
23    borderRadius: 10,
24    padding: 40,
25  },
26});
27
28function ContentScript() {
29  const { modal, overlay } = useStyles();
30  const [open, setOpen] = useState(false);
31
32  chrome.runtime.onMessage.addListener((message) => {
33    if (message.value === "openPopup") {
34      setOpen(true);
35    }
36  });
37
38  if (!open) return null;
39
40  return (
41    <Box className={overlay}>
42      <Box className={modal}>
43        <Typography>Popup</Typography>
44        <Button variant="contained" onClick={() => setOpen(false)}>
45          Close
46        </Button>
47      </Box>
48    </Box>
49  );
50}
51
52export default ContentScript;

Let’s run build again to update our build files.

npm run build

To make sure the app content script is run by the browser, we need to add it in the manifest.json as a content script with a specific path. But if we look into the build folder we previously generated, we will see that there is no main javascript file to load, only a bunch of chunks and we can’t tell which is the popup app and which is the injected app.

The main problem of Chrome Extensions and CRA

As we know, CRA is built using webpack, which is configured to bundle our application’s code and generate chunks of JavaScript which are then loaded by the application. This way of chunking code results in randomly generated files whose names change every time we run the build command. Let’s recall the structure of chrome extensions: we have content and background scripts, and a manifest.json.

In the manifest, we pass paths to the scripts to tell the browser which files it should load. The problem is, the manifest is a static json file so we have no way to dynamically tell the names of the JavaScript chunks we want to load. To fix this problem, we need to reconfigure webpack in a way that it will generate JavaScript files with non-changing names. And to do that we need to eject out of CRA.

npm run eject

This command will create a /config directory and there expose webpack configuration files to us.

We need to change two files, ‘paths.js’ and ‘webpack.config.js’ to disable chunking and tell webpack what to name the files.

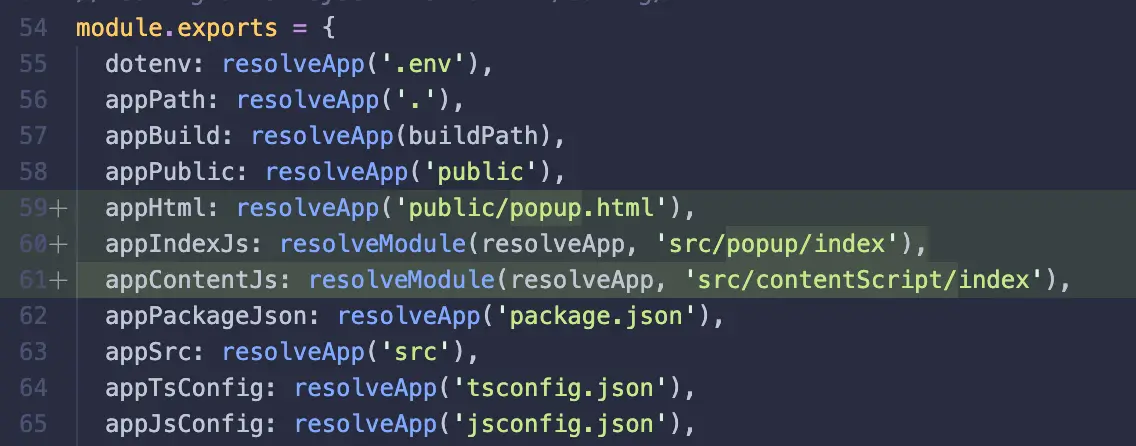
1// Add popup and content index js files – paths.js, lines 59-61
2
3  appHtml: resolveApp('public/popup.html'),
4  appIndexJs: resolveModule(resolveApp, 'src/popup/index'),
5  appContentJs: resolveModule(resolveApp, 'src/contentScript/index'),
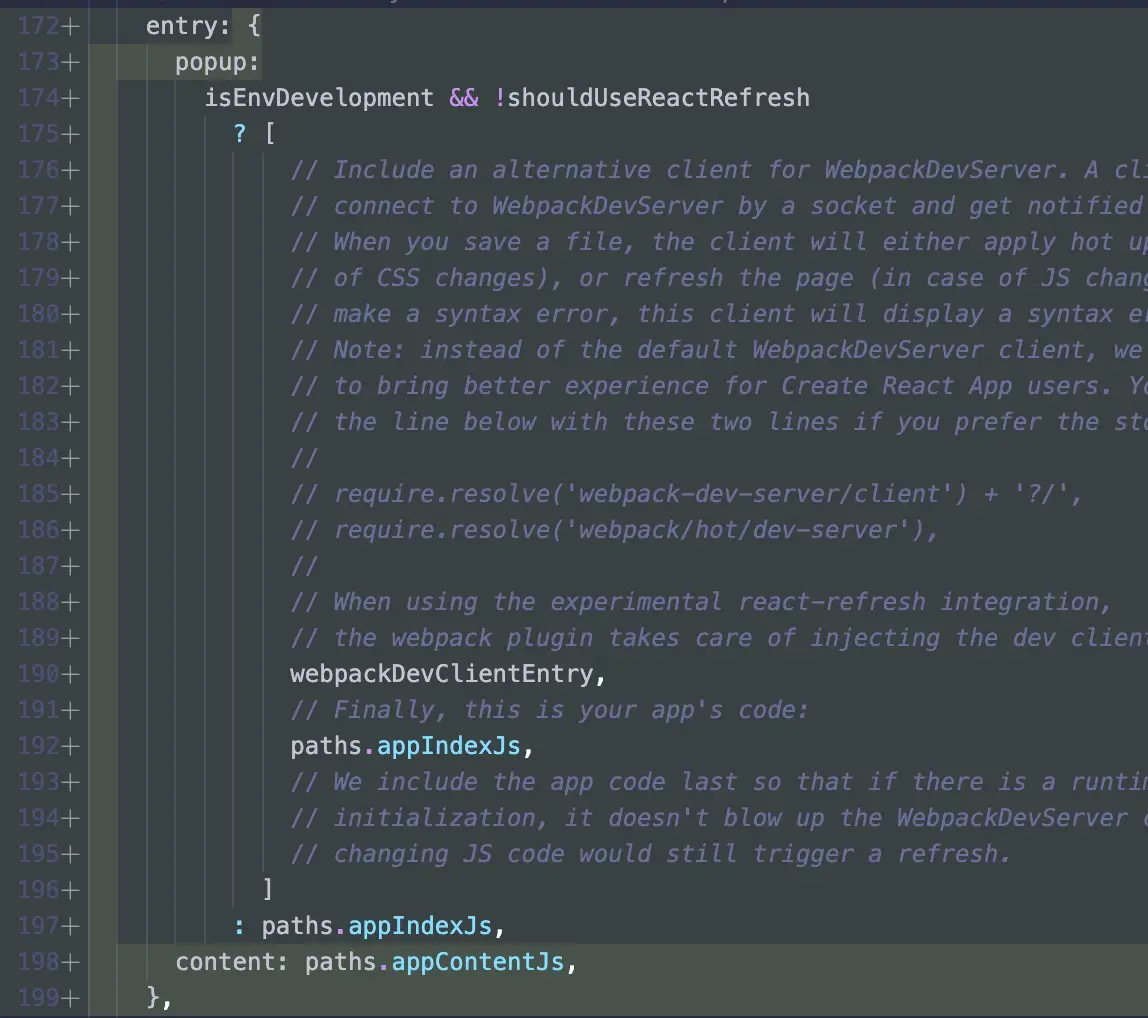
1// Define popup and content entry points – webpack.config.js, lines 172-200
2
3 entry: {
4      popup:
5        isEnvDevelopment && !shouldUseReactRefresh
6          ? [       
7              webpackDevClientEntry,
8              paths.appIndexJs,
9            ]
10          : paths.appIndexJs,
11      background: paths.appBackgroundJs,
12      content: paths.appContentJs,
13    },
1// Define output, remove the [contenthash] part from the generated file names – webpack.config.js lines 208-215
2
3    output: {
4      // The build folder.
5      path: isEnvProduction ? paths.appBuild : undefined,
6      // Add /* filename */ comments to generated require()s in the output.
7      pathinfo: isEnvDevelopment,
8      // There will be one main bundle, and one file per asynchronous chunk.
9      // In development, it does not produce real files.
10      filename: isEnvProduction
11        ? 'static/js/[name].js'
12        : isEnvDevelopment && 'static/js/bundle.js',
13      // TODO: remove this when upgrading to webpack 5
14      futureEmitAssets: true,
15      // There are also additional JS chunk files if you use code splitting.
16      chunkFilename: isEnvProduction
17        ? 'static/js/[name].js'
18        : isEnvDevelopment && 'static/js/[name].chunk.js',

Remove the [contenthash] part from the generated file names.

Disable code chunking – webpack.config.js line 302 & 306
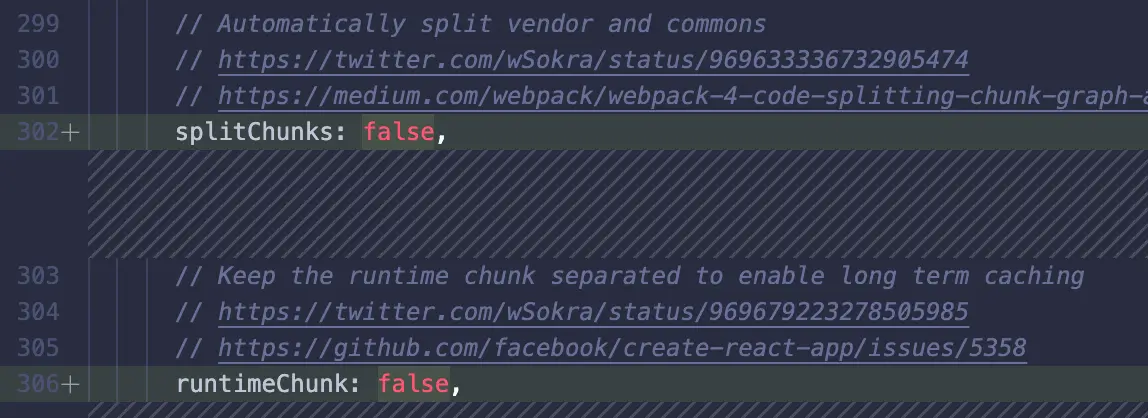
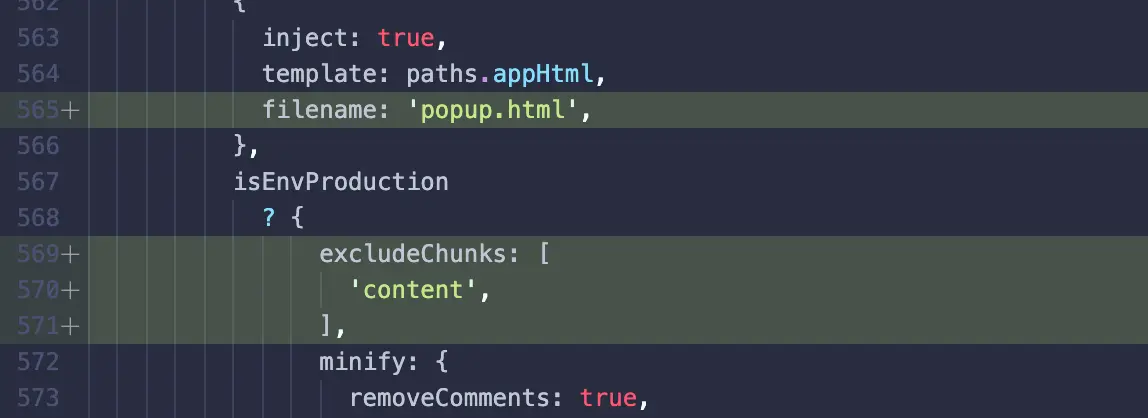
1// Pass popup.html as name and exclude content from being injected into popup.html – webpack.config.js, lines 558-571
2
3 plugins: [
4      // Generates an `index.html` file with the <script> injected.
5      new HtmlWebpackPlugin(
6        Object.assign(
7          {},
8          {
9            inject: true,
10            template: paths.appHtml,
11            filename: 'popup.html',
12          },
13          isEnvProduction
14            ? {
15                excludeChunks: [
16                  'background',
17                  'content', 
18                ],

Pass popup.html as name and exclude content from being injected into popup.html

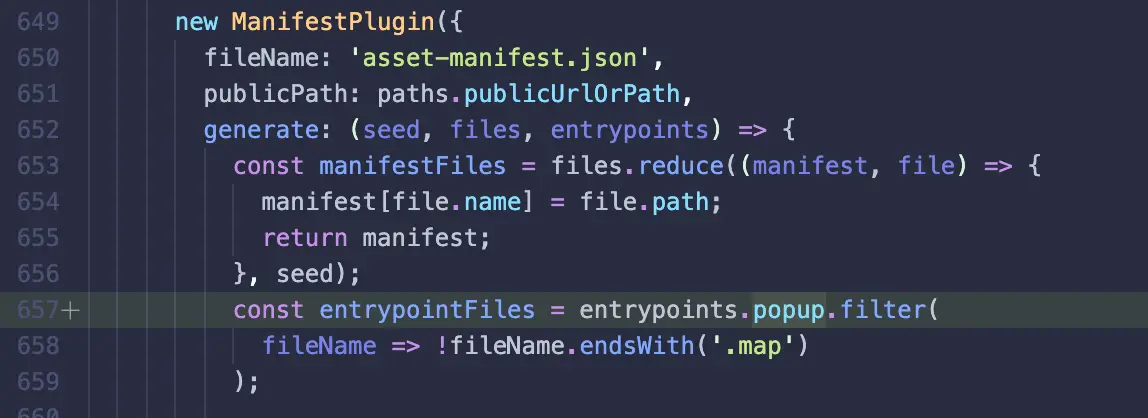
1// Rename main into popup (since that’s what we called the main entrypoint) – webpack.config.js, lines 657-659
2
3     const entrypointFiles = entrypoints.popup.filter(
4            fileName => !fileName.endsWith('.map')
5          );

Rename main into popup (since that’s what we called the main entrypoint)

Whew, that was quite a bit!

This way we can control how and where our JavaScript is output, so we can keep our file paths static.

The last thing we have to do now is add the new static js file paths to our content script field in the manifest.json and the related permissions shown below.

1// manifest.json
2
3{
4  "name": "React App",
5  "description": "Create React App Sample",
6  "version": "1.0",
7  "manifest_version": 2,
8  "browser_action": {
9    "default_popup": "popup.html",
10    "default_icon": "logo192.png",
11    "default_title": "Open the popup"
12  },
13  "icons": {
14    "16": "logo192.png",
15    "48": "logo192.png",
16    "128": "logo192.png"
17  },
18  "background": {
19    "scripts": ["static/js/background.js"]
20  },
21  "content_scripts": [
22    {
23      "matches": ["<all_urls>"],
24      "js": ["static/js/content.js"]
25    }
26  ],
27  "optional_permissions": ["<all_urls>"],
28  "permissions": ["tabs", "activeTab"]
29}

We can now build our React application and run it as a content script. Yay!
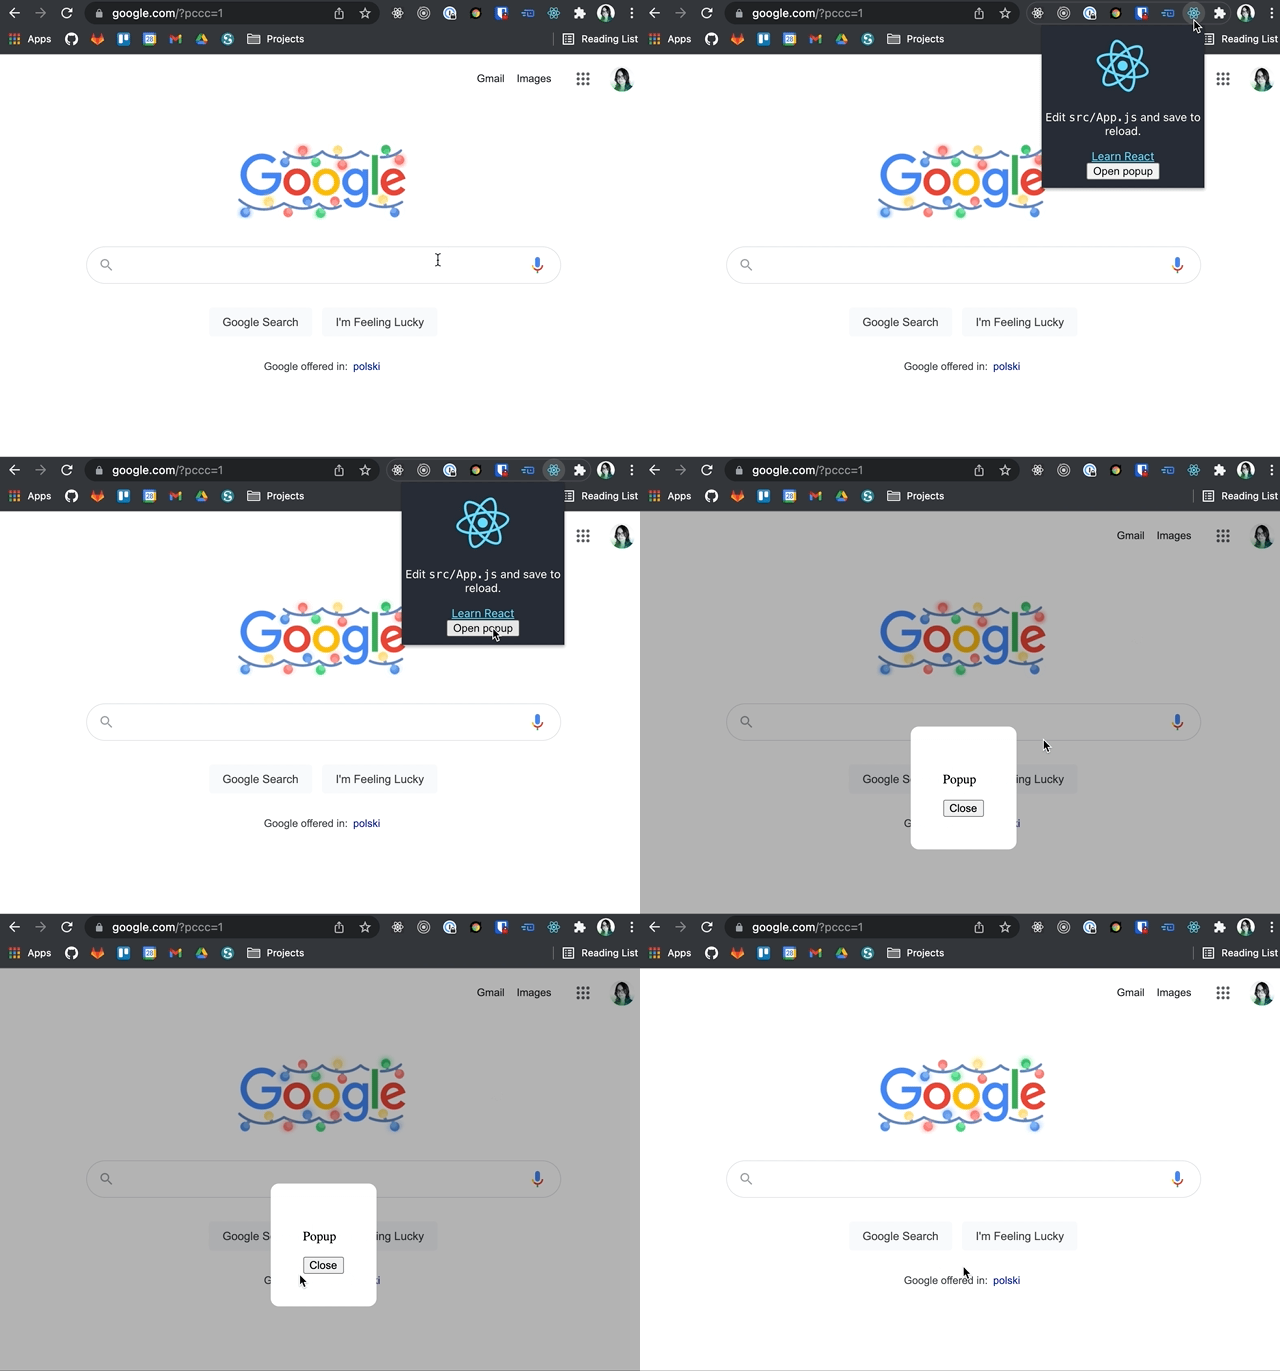
Let’s add one more thing: a background script.

To do that, we’ll follow the previous steps of adding a new subfolder src/background with an index.js file for our background script to live in.

To allow communication between all the different extension parts and scripts, the chrome extension API provides a messaging functionality. We can send a message from the content script to the background script, execute some logic in the background script, and send (or not) a response back to the content script.

1chrome.runtime.onMessage.addListener((message, sender) => {
2  chrome.tabs.sendMessage(sender.tab?.id, {
3    value: message.value + " + " + "hello from background script",
4  });
5});

We’ll just grab the message text and add ” + hello from background” to it before sending it back.

We can then intercept the message within the content script and for example display it in the frontend.

1chrome.runtime.onMessage.addListener((message) => {
2  setMessage(message.value);
3  if (message.value === "openPopup") {
4    setOpen(true);
5  }
6});

We can get the message from the listener and display it with useState.

We’ll have to adjust the webpack configuration to exclude the background script from chunking too.

1// Add background/index.js to paths.js – line 61
2
3appBackgroundJs: resolveModule(resolveApp, 'src/background/index'),

Add background/index.js to paths.js

1// Add background path in webpack config. – line 198
2
3background: paths.appBackgroundJs,

Add background path in webpack config.

1// Exclude background script from being injected into popup.html – webpack.config.js, line 571
2
3isEnvProduction
4  ? {
5    excludeChunks: [
6    'background',
7    'content', 
8  ],

Exclude background script from being injected into popup.html

The difference between a background script and a context script is that content scripts run within the context of a webpage in one tab – so, if you have many tabs open, you might be running multiple instances of the content script, one in each tab. The background script on the other hand runs as one background process in the browser, no matter how many tabs you have open.

Conclusion

Building chrome extensions with React can be tricky and difficult to debug, but we have tackled the main problems successfully. We have managed to build a chrome extension using React by doing one major thing: ejecting out of CRA and changing the webpack configuration. Of course the solution given here is just one of many – you’re welcome to go ahead and adjust it to suit your needs specifically.

After you are done with building and testing your application, you can publish the extension on Chrome Web Store, where it will undergo an official review before going live.

Project code: https://github.com/teacodeio/chrome-extension-article

Table of Contents:

Similar articles:

Subscribe to our newsletter