
Table of content
- What is AWS Amplify?
- Planning out the app
- Basic Setup
- Frontend Setup
- Adding a GraphQL API
- Adding UI to the App
- Run it locally
- Adding authentication
- Deploy the App!
Enormous data sets from the Internet are transforming daily lives and industries around the world. In these times, modern organizations can use databases to store huge amounts of data for analytical purposes. They analyze it order to make better business decisions and to enhance their work efficiency.
Modern databases often support complex queries and we expect that they will provide immediate responses for them. For this reason, database administrators have to implement methods for increasing efficiency.
Here we can distinguish some of the challenges that one may encounter:
- Provide safety of data
- Significant increase in data
- Scalability
What is a NoSQL database?
NoSQL, also known as non-relational database, is a kind of database where you can store, organize, and find data differently than in traditional relational databases.
NoSQLs are an alternative to SQL (Structured Query Language) databases, where data is placed in tables and data schema is carefully planned before the database is built.
Relational database stores data in table form with labeled rows and columns. Even though relational database provides an acceptable solution for storing data – speed and scalability could be an issue in some cases.
Non-relational databases have been created from the need to operate with larger volumes of data, which forced the transition to clusters of less efficient servers.
The considerable advantage of NoSQL databases is horizontal scaling. We can consider NoSQL ‘documents’ as sort of ‘self-contained’ objects, which can be on different servers without concern about joining rows from multiple machines.
The common structures adapted by NoSQL databases to store data are key-value pairs, graphs, wide columns, or as written before – documents. Documents are organized in a structure called a “collection”. As an analogy, we can think of a document as a row in a table and a collection as the table itself.
An example of a NoSQL database is MongoDB, which is a type of document store database. Now we can proceed to the real introduction to MongoDB 🙂
How to start with MongoDB?
We will consider installing a database in the macOS environment.
In the very beginning, please make sure that you have Homebrew installed. You can check this by inputting “brew -v”, which should show you the version of Homebrew that is installed.

If you haven’t installed it yet, you should install it by:
“$ /bin/bash -c “$(curl -fsSL https://raw.githubusercontent.com/Homebrew/install/master/install.sh)”“
After installation of Homebrew, we can start installing MongoDB. We will install version 5.0, which is the most current version at the moment of writing this article.
“brew install [email protected]”
The next step is to start MongoDB as a macOS service. This NoSQL database will start in the background automatically.
“brew services start [email protected]”
The last step is to connect a mongo shell to the running instance and type in the terminal:
“mongo”
And that’s it! MongoDB is now running.
Working with MongoDB
To start working with MongoDB we have to switch to our new database by typing “use [yourDatabaseName]” in the terminal and then we will check that everything is working properly by typing: “db”.

If you see on your terminal similar information as on the screenshot above, we can create our first collection by inserting the first document.
We will create a collection called: “users” and insert the key name with the value: “Mike”.
db.users.insertOne( { name: ‘Mike’ } );

And here we have created our first collection of users.

In order to better control your collection, I recommend that you install Robo 3T. Which you can find on the official website: https://robomongo.org/
I will use Robo 3T in this project (article).
CRUD Operations
As an introduction to the MongoDB database, I will describe the well-known operations for every programmer and probably in all programming languages – CRUD operations, which is an acronym of “Create, Read, Update and Delete”. The non-relational database MongoDB has lots of methods of managing documents, but I will describe only the most common practices among programmers.
Create operations
db.collection.insertOne()
.insertOne – it allows you to insert only one document into the database. It takes as an argument the document saved in JSON standard with the key-value pairs.
Example:
db.users.insertOne({ name: ‘Michal’ })
This should show you an object with a newly created Id.
{ “acknowledged” : true, “insertedId” : ObjectId(“5f831a9de0aa4cf0a66858f8”) }

and in the database, your document should now look like this:
{
_id: ObjectId(“5f831a9de0aa4cf0a66858f8”)
name: “Michal”
}

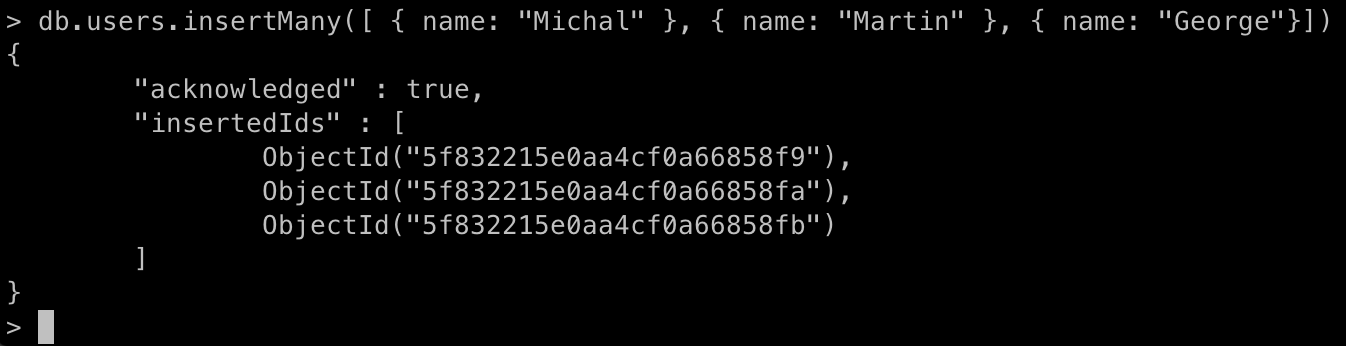
db.collection.insertMany()
.insertMany() – it allows you to insert an array of documents to the collection. It takes as an argument an array of JSON objects with the key-value pairs.
Example:
db.users.insertMany([
{ name: ‘Michal’ },
{ name: ‘George’ }
{ name: ‘Martin’ }
])
It should show you an object with a newly created array with Object Ids.
{
“acknowledged” : true,
“insertedIds” : [
ObjectId(“5f832215e0aa4cf0a66858f9”),
ObjectId(“5f832215e0aa4cf0a66858fa”),
ObjectId(“5f832215e0aa4cf0a66858fb”)
] }
and in the database, your documents should look like this:
{
_id: ObjectId(“5f832215e0aa4cf0a66858f9“)
name: “Michal”
},
{
_id: ObjectId(“5f832215e0aa4cf0a66858fa“)
name: “George”
},
{
_id: ObjectId(“5f832215e0aa4cf0a66858fb“)
name: “Martin”
}

Deprecated:
db.collection.insert() – it works just like .insertOne(), but it replaced it from version 3.2 onwards.
Read operations
db.collection.find(query, projection) – it returns the cursor to the documents that match the query criteria.
Find method gets two optional arguments:
- query – it specifies the selection criteria. If you want to return all the documents, you have to omit this parameter or enter an empty JSON object: “{}”
- projection – specifies the fields that should be returned from the matched query.
Invoking .find on the previously created collection of users will look like following:

db.users.find()
That created query should return all of the documents in the collection of users.
What if we wanted to find all the users that fulfil the criteria of age greater than 18?
We need to use comparison query operators.
db.users.find({ age: { $gt: 18 }})

It returned the cursor that met the criteria of the query.
db.collection.findOne(query, projections)
It works similarly to the find() method, but it returns the document that fulfils the query.
Update operations
db.collection.update(query, update, options)
This method modifies the fields of an existing document or documents. It can also replace the entire document, depending on what will be inserted in the update parameter.
It takes the following parameters:
- Query – it is the selection criterion for the update.
- Update – modifications that we want to apply to the searched document
- Options – optional parameter, where we can specify what additional action should happen e.g. upsert.
As an example, we can update the document from ‘users collection’ in our database.
Firstly, let’s see what it looks like now.
db.users.find()
As you can remember, ‘find’ without argument returns us the whole ‘users collection’:

Now we will update the age of Michal.
db.users.update({ name: ‘Michal’ }, { name: ‘Michal’, age: 27 })
what is returned:

So, we can see that one document matched and one was modified. That’s fine. Now, let’s check how the ‘users collection’ looks like.

As you can see, the document with the value of the key name ‘Michal’, has now updated the key ‘age’.
One option worth mentioning in the update method is ‘upsert’. It creates a new document when no document in the collection matches the criteria of the query.
Let us check this in practice. As an example, I will try to update the non-existing document with the key “name” value “Jacob”.
db.users.update({ name: ‘Jacob’ }, { name: ‘Jacob’, age: ’28’ }, { upsert: true })

Once again I will invoke the find method in the collection users. It returns the array with JSON objects with known before key-value pairs. The results show us the information that no object met the criteria. Eventually, one object has been created.

Delete operations
db.collection.deleteOne()
This method deletes one document that matches the query criteria. It is necessary to use a unique index as a parameter, like an ID.
From our ‘users collection’ we want to remove the following document with key name value “John” and key age value “5”.
{ “_id” : ObjectId(“5f831a9de0aa4cf0a66858f8”), “name” : “John”, “age” : 5 }
As we can imagine, name and age are not good examples of unique indexes in our collection. They can be repeated multiple times, so we will use the _id which must have a unique value.
db.users.deleteOne({ _id: ObjectId(“5f831a9de0aa4cf0a66858f8”) })
The result of entering this command should look like this:

and our collection will have now four documents:

db.collection.deleteMany()
It is used to remove multiple elements from the collection that fit the given criteria.
We can use this method in order to remove all the documents in which the key “age” value is higher than 20. To do this we can use the below method:
db.users.deleteMany({ age: { $gt: 20 } })
I used comparison query operators when I described the “find” method.
As a result of using this command, we can see the information that three documents were removed.

Eventually, our collection should have only one document with the key name value “Martin”.

Conclusion
MongoDB is an easy-to-learn document store database, which is often used with a combination of ExpressJS, React, and NodeJS as a basic database in a stack called simply MERN.
In most cases the performance is sufficient and this face makes MongoDB a good database for projects with simple data access.
The future of MongoDB looks bright because there is still a trend toward building web-based applications that require simple (but many!) queries going on, which MongoDB can manage.
If you are not sure how to start with databases in general – I suggest you using MongoDB as your first go-to choice. It is easier to start and to get used to than relational SQL databases.